Don't Push robot
Introduction
On some forum, I saw an animated gif of a nice lego robot. It showed a box with a small brick sticking out. In the animation, a hand pushed the brick. This caused a lid in the box to open, which exposed a pin that pushed the brick to its original position. Finally, the lid would close. Really nice, so I tried to build one myself.
A made a small movie (using ffmpeg) of the end result. Check it out on YouTube.
The YouTube movie.
Mechanics
In this project, the mechanics was the hardest part. Of the mechanics, I struggled the most with the lid on top of the box. It is not easy to create a lid that (1) integrates completely (invisibly) with the flat top of a box, and (2) can still be opened and closd. I did not succeed in a "flap" lid, so after 5 prototypes, I settled for a "lifting" lid.
The next hardest thing was the pin that pushes the person back. I experimented with a linearly moving pin, but when I tried the "hook", it was so simple and so easy to integrate with the lid that only two protoypes were needed.
The final hurdle was to fit the lid mechanics, the pin, two motors, the sensor (for the person), and (above all) the rcx, in a simple (small?) black box. One aspect worth noting, is that the lid as well as the pin are driven by a motor via a rubber belt. This ensures that we can drive the motor even when the lid or pin is in its extreme position: the belts will slip. This is a mechanical safety net, saving us from using sensors to measure the extreme positions.
I have made some sketches of the (main geometry features of the) lid and the pin. See the pdf for details. The design of the box is left to the reader.

The person (click to enlarge).
Software
The software is rather trivial for this robot. It was written in NQC using Bricx Command Center.
// Project: DontPush
// 2010 aug 2 Maarten Pennings
/*
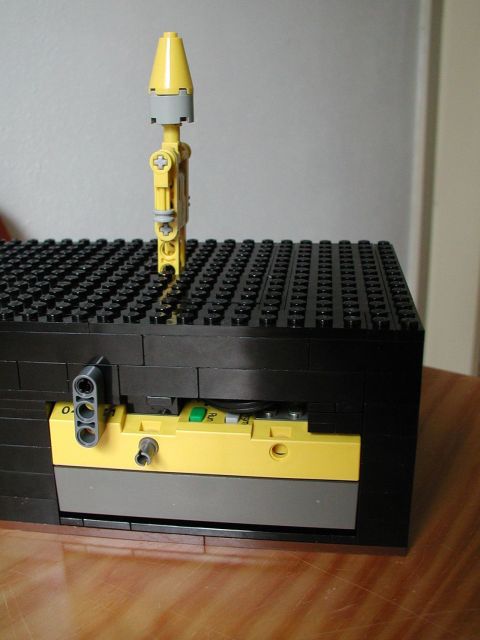
The "robot" consists of a big black box with all "hardware" (motors, sensor,
rcx, lid, pin) hidden inside. The only visible external item is a yellow
person. When this person is pushed down, the "hidden" lid of the box opens
and the pin extends pushing the person back to its upright position.
The pin retracts, the lid closes, and the robot waits for the next cycle
of somebody pushing the person down again.
*/
// The 'PERSON' is the sensor that detects when the person is pushed down
#define PERSON SENSOR_2
#define PERSON_DOWN 1
// The 'LID' is the motor opening and closing the lid of the box
#define LID OUT_B
#define LID_OPEN OUT_REV
#define LID_CLOSE OUT_FWD
#define LID_POWER OUT_FULL
#define LID_TIME 150
// The 'PIN' is the motor extending and retracting the pin that pushes the person back
#define PIN OUT_C
#define PIN_EXTEND OUT_REV
#define PIN_RETRACT OUT_FWD
#define PIN_POWER OUT_FULL
#define PIN_TIME 250
task main()
{
SetSensorType(PERSON, SENSOR_TYPE_TOUCH);
SetPower(LID,LID_POWER);
SetPower(PIN,PIN_POWER);
while( 1 ) {
PlaySound (SOUND_CLICK);
until( PERSON==PERSON_DOWN ) /*wait*/ ;
// Phase 1: open lid
SetDirection(LID,LID_OPEN);
SetOutput(LID,OUT_ON);
Wait(LID_TIME);
SetOutput(LID,OUT_OFF);
// Phase 2: extend pin
SetDirection(PIN,PIN_EXTEND);
SetOutput(PIN,OUT_ON);
Wait(PIN_TIME);
// Phase 3: retract pin
SetDirection(PIN,PIN_RETRACT);
Wait(PIN_TIME);
SetOutput(PIN,OUT_OFF);
// Phase 4: close lid
SetDirection(LID,LID_CLOSE);
SetOutput(LID,OUT_ON);
Wait(LID_TIME);
SetOutput(LID,OUT_OFF);
}
}
Icing on the cake
The black box features two details worth mentioning.
The first detail is not visible in the movie: the back side of the box has a slot for the rcx. It has a small "lock"; when it is turned, the rcx slides out, which allows for easy battery replacement, selecting the program number, and powering the robot.
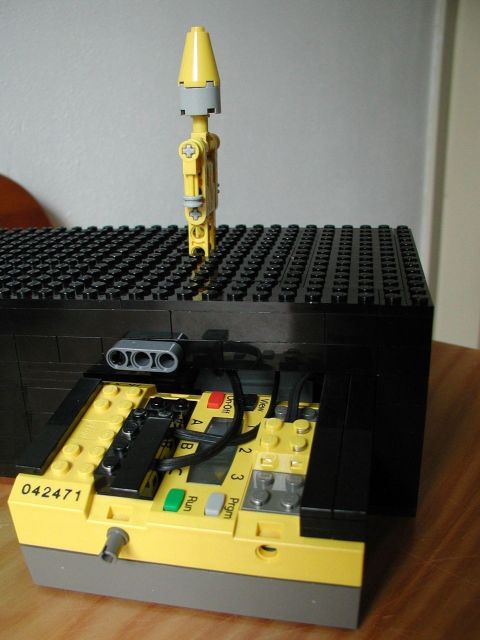
The slot with the rcx locked inside (left) or removed (right).
The second detail is clearly visible in the movie, it's the mosaic "Don't Push". As Eric explains there are three methods to make a mosaic, named after the way the studs (tiny cylinders on top of a lego brick) are placed. The first methods is known as "studs out". It is used by the Lego company for offical mosic sets, e.g. 6162. These mosaics need to be viewed from the top. The second methods is "studs up" way. The lego bricks are stacked the normal way. These mosaics are viewed from the sides. This is the method I used for the robot; I just needed a lot of plates and 1-by-1 bricks in the right colors. The third method is known as "studs not on top" usually abbreviated to SNOT. It offers the sharpest images, but it is for die-hards. The actual lego creation is built studs up, but parts of the mosaic are rotated 90 degrees.
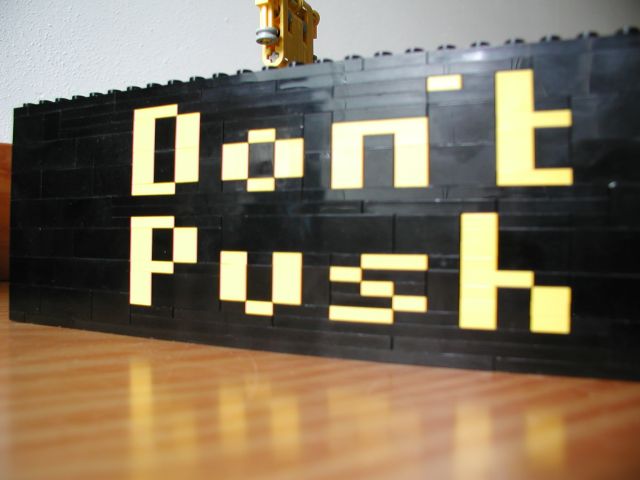
The mosiac in detail (click to enlarge).

