Custom keyboard
Download the source of this article.
1. Introduction
When using an application, we have to fill out alpha numeric fields. Since most phone or tablets don't have a full keyboard, Android offers us so called soft keyboards. In the figure below (left), we see the full keyboard on tablet. It should be noted that Android's soft keyboards are context sensitive: when the field is a phone number a different keyboard pops up (see the right figure below).
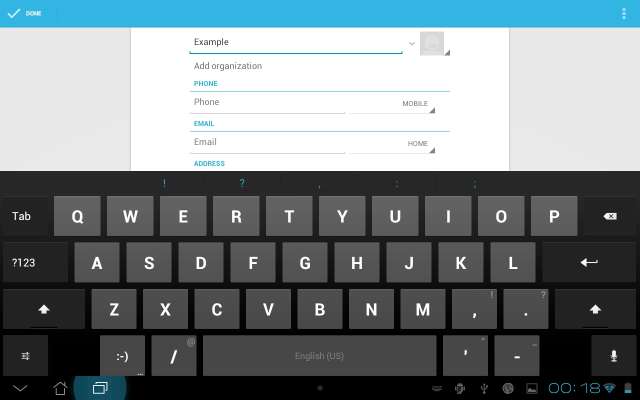
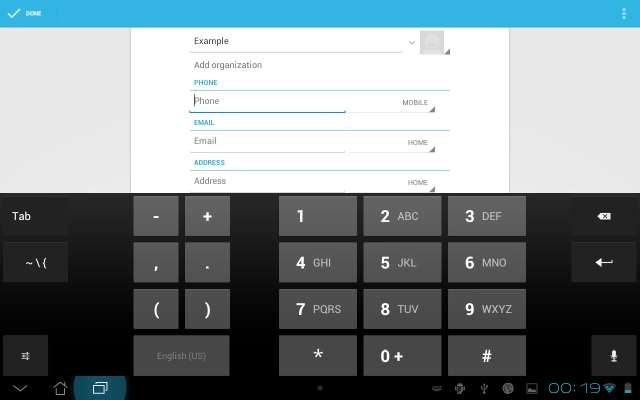
Entering a contact's name (left) and his phonenumber (right) with the standard Android Keyboard.
This question addressed in this article is: how can a developer offer a custom keyboard. More specifically we have a field that requires a hexadecimal number to be entered, so we are looking for a keyboard with the keys 0 to 9 and a to f.
2. Analysis
What kind of keyboards exist, next to the standard Android keyboards?
2.1. Manufacturer keyboard
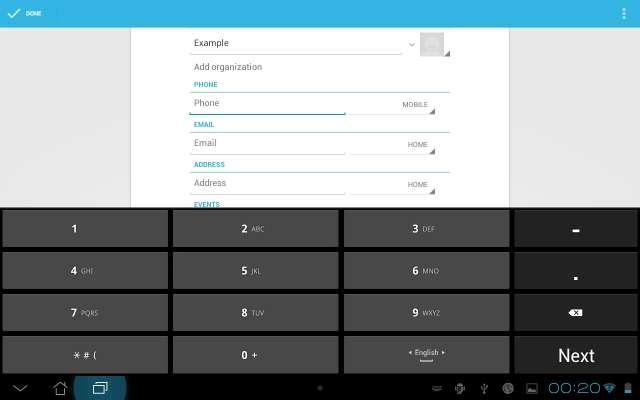
One of the first things we notice on an Asus tablet is that we have the choice of using the standard Android keyboard, or using an Asus keyboard. The figure below shows the full text (left) and phone number only (right) keybaords of Asus.

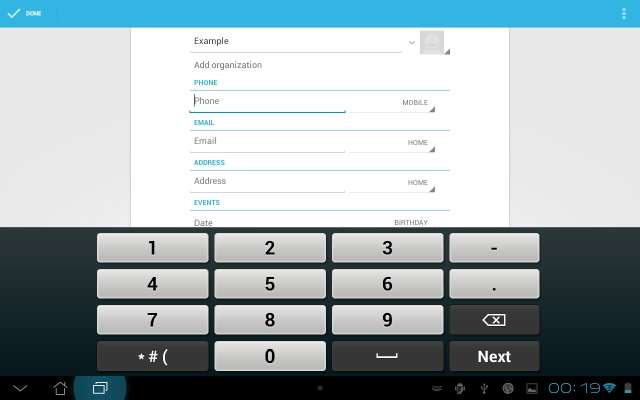
Entering a contact's name (left) and his phonenumber (right) using the Asus keyboard.
We see big differences. The Asus phone keyboard has fewer keys (it doesn't have the obscure -/+/,/. keys), whereas the Asus full keyboard has more keys (it does have keys for all digits).
2.2. User installed keyboard
We saw above that manufacturers have the ability to add keyboards, where they are completely free in chosing a layout. Can we do that as an end-user?
Yes!
For example, we can install the Hacker's keyboard. Please note that installing a keyboard is not without risk: all keys pass this application, and this includes your passwords!

Entering a contact's name (left) and his phonenumber (right) using the Hacker's keyboard.
We see again big differences. Most notably, we see cursor keys and extra 'shift' keys (control and alt). And they work (including ctrl-v to paste)!
2.3. Input type
Besides the fact that a user can select which keyboard "service" (yes, each of these keyboards - Android, Asus, Hackers - runs a task) is active, we notice there is another mechanism to select which keyboard "layout" (full, phone) is chosen. Who choses that?
It's the application programmer that makes that choice. For example, an EditText has a field inputType that decides which layout to use. For example android:inputType="text" selects the full keyboard and android:inputType="phone" select the phone number one. See the developer site for the other types.
An no, there is no input type for hexadecimal numbers.
2.4. Dialog
Besides the keyboard services with multiple layouts, we see another approach. For examle, when we have to enter a date, we do not get a date specific keyboard, rather we get a date specific dialog. See the fgure below.
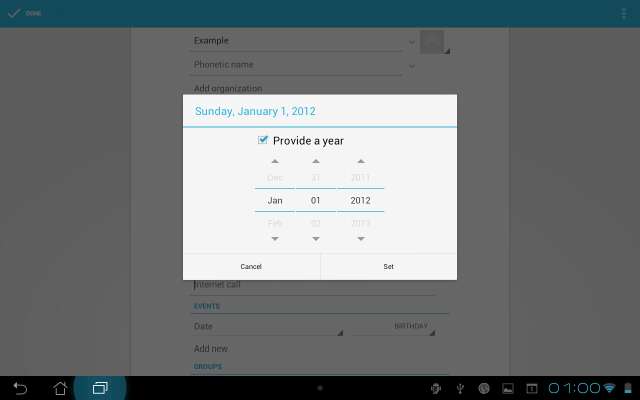
A dialog geared towards a specifc type of field (date in this case).
2.5. Conclusion
We could write our own keyboard service. But that looks like a hell of a lot of work (multiple layouts, accents, spell check support, locale specific fonts). Furthermore, it means that our customers (the end users of our app) not only have to install our app, but also the keyboard service (second apk?). They are not likely to do that, because wise users see the security issues with that. Finally, it probably will not help anyway. The reason is that there is no inputType for hexadecimal, so our app can not even request a hex layout to the keyboard service. So, writing a keyboard service is definitly a no go.
So, it looks like we are stuck with writing a dialog (just like the date picker) that has buttons for 0..9, a..f, ...
But wait, there is this badly known KeyboardView. What's that?
3. KeyboardView
Let's have a look at the KeyboardView class.
3.1. High level overview of the KeyboardView
Since API level 3, Android has a KeyboardView. As the name suggests, this is a View, so it is part of the layout of an activity. This is good news an bad news. It is bad news, because it means we have to obscure all layout files of our applications with a view for a keyboard. It is good news, because it means we are in full control in our app.
But wait, what will the KeyboardView show? The answer to this is that we have to associate a Keyboard with the KeyboardView. A keyboard consists of Rows, and rows consist of Keys, and keys are associated with a label (what is shown on the key button) and a code (what is sent to the app when the key is pressed).
So, that's four classes to study:
But it is not that bad: a Keyboard can be setup with a single (ok, rather large) xml file. It lists all rows, their keys, and per key the label and the code. So, what we see in practice is a KeyboardView in our activity (activities), one or more xml files with a keyboard layout (in our case one file describing a hexadecimal keyboard layout), and a single line of code to assign the Keyboard to the KeyboardView. And then there are some issues in when to show the keyboard.
Let's look at the details.
3.2. Creating a KeyboardView
The KeyboardView is a View like any other, so we include it in the layout file of our activity. Nevertheless, there are a couple of noteworthy remarks; they are marked red in the code fragment below.
<RelativeLayout xmlns:android="http://schemas.android.com/apk/res/android"
    xmlns:tools="http://schemas.android.com/tools"
    android:layout_width="match_parent"
    android:layout_height="match_parent" >

    <EditText
        android:id="@+id/edittext0"
        android:layout_width="fill_parent"
        android:layout_height="wrap_content"
        android:layout_alignParentTop="true"
        android:layout_centerHorizontal="true"
        android:drawableRight="@drawable/hex"
        android:inputType="text" />

    <EditText
        android:id="@+id/edittext1"
        android:layout_width="fill_parent"
        android:layout_height="wrap_content"
        android:layout_below="@id/edittext0"
        android:layout_centerHorizontal="true"
        android:drawableRight="@drawable/txt"
        android:inputType="text" />

    ...

    <android.inputmethodservice.KeyboardView
        android:id="@+id/keyboardview"
        android:layout_width="fill_parent"
        android:layout_height="wrap_content"
        android:layout_alignParentBottom="true"
        android:layout_centerHorizontal="true"
        android:focusable="true"
        android:focusableInTouchMode="true"
        android:visibility="gone" />

</RelativeLayout>
First of all, the KeyboardView will be used to show a keyboard. Typically, keyboards are at the bottom of the screen (android:layout_alignParentBottom="true"), filling the complete width (android:layout_width="fill_parent"); this is easily achieved in RelativeLayout (maybe throw in a vertical scroll bar). Secondly, the keyboard is hidden by default (android:visibility="gone"); we use the gone value instead of invisible to completely hide it. Thirdly, the KeyboardView, for reasons unknown to me, is not part of a package that is automagically found. So, we need to add the full path (android.inputmethodservice.KeyboardView).
Unfortunately, the graphical layout editor in Eclipse cannot find that package either. So it gives an exception (java.lang.NoClassDefFoundError: Could not initialize class android.inputmethodservice.KeyboardView) and the keyboard is not shown. I have no idea how to fix that (I would expect that I could add a search path to the graphical layout editor in Eclipse). The feedback I got from Jan, is that Android Studio gives the same complaint.
3.3. Creating a Keyboard
The prevous section showed how to create a KeyboardView. This is a view, so this was most easily done in xml: the actvity has a layout file activity_main, which contains a view of type KeyboardView with id keyboardview.
The second step is to create a Keyboard. A Keyboard is a data structure describing rows of keys, each with their label and key code. A large part is also done in xml (file hexkbd), and a small part is done programatically; see the code fragment below.
@Override protected void onCreate(Bundle savedInstanceState) {
    super.onCreate(savedInstanceState);
    setContentView(R.layout.activity_main);
    ...
    // Create the Keyboard
    Keyboard mKeyboard= new Keyboard(MainActivity,R.xml.hexkbd);

    // Lookup the KeyboardView
    KeyboardView mKeyboardView= (KeyboardView)findViewById(R.id.keyboardview);
    // Attach the keyboard to the view
    mKeyboardView.setKeyboard( mKeyboard );
    // Do not show the preview balloons
    mKeyboardView.setPreviewEnabled(false);
    ...
}
The image below shows where the two xml files (activity layout and keyboard layout) are located.
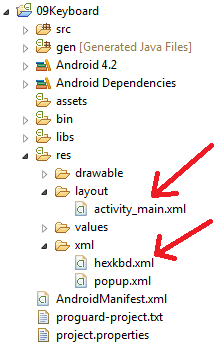
The location of the xml files.
3.4. The Keyboard xml layout file
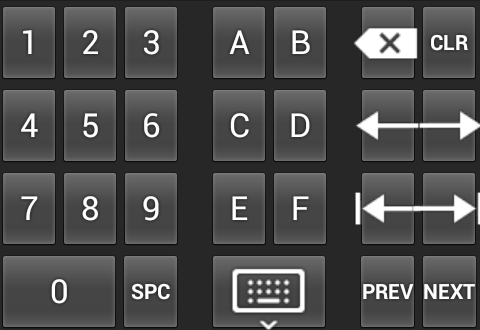
The xml file hexkbd describes the complete keyboard. Recall that we want to make a hexadecimal keyboard, so we have relatively few keys. In order to illustrate some points, we have added a number of keys: backspace/clear all, cursor left/right, cursor begin/end, prev/next field and keyboard hide button.

The design of our hexadecimal keyboard.
Observe that we have a 'keyboard hide' button (centre of the lowest row). Many KeyboardView keyboards have this because the normal 'hide keyboard' feature in the system bar doesn't work anymore. We can see this in the figure: the bar at the bottom still shows the 'Back' soft key instead of the 'Hide keyboard' softkey.
3.4.1. Key sizes
One of the great features (I miss that in activity layouts...) is the fact that (key) sizes can be expressed in percentages relative to the parent container (by using %p as unit). This also means that we have no (ok little) worries on landscape versus portrait.
When we define a keyboard, we have three levels where we can set properties: at keyboard level, at row level, and at key level. Since most keys on a keyboard have the same size, it makes sense to set the keysize at the keyboard level, and have some overrides at key level. As we can see in the figure above, each row in our hexkbd has 3 keys, a gap of half a key, 2 keys, again a gap of half a key, and finally 2 keys. This sums up to 8 keys, so the key width is 1/8 of 100% or 12.50%. We set the key height to 10%, which means that the full keyboard (4 rows) takes 40% of the complete screen. We have two width overrides: the '0' key has double width (25%) and the 'keyboard hide' key has double width (25%). These size settings are shown in blue in the code fragment below.
<?xml version="1.0" encoding="utf-8"?>
<Keyboard xmlns:android="http://schemas.android.com/apk/res/android"
    android:keyWidth="12.50%p"
    android:keyHeight="10%p" >

    <Row>
        <Key android:codes="55"    android:keyLabel="7" android:keyEdgeFlags="left" />
        <Key android:codes="56"    android:keyLabel="8" />
        <Key android:codes="57"    android:keyLabel="9" />
        <Key android:codes="65"    android:keyLabel="A" android:horizontalGap="6.25%p" />
        <Key android:codes="66"    android:keyLabel="B" />
        <Key android:codes="-5"    android:keyIcon="@drawable/sym_keyboard_delete" android:isRepeatable="true" android:horizontalGap="6.25%p" />
        <Key android:codes="55006" android:keyLabel="CLR" android:keyEdgeFlags="right"/>
    </Row>
    <Row>
        <Key android:codes="52"    android:keyLabel="4" android:keyEdgeFlags="left"  />
        <Key android:codes="53"    android:keyLabel="5" />
        <Key android:codes="54"    android:keyLabel="6" />
        <Key android:codes="67"    android:keyLabel="C" android:horizontalGap="6.25%p" />
        <Key android:codes="68"    android:keyLabel="D" />
        <Key android:codes="55002" android:keyIcon="@drawable/sym_keyboard_left" android:isRepeatable="true" android:horizontalGap="6.25%p" />
        <Key android:codes="55003" android:keyIcon="@drawable/sym_keyboard_right" android:isRepeatable="true" android:keyEdgeFlags="right" />
    </Row>
    <Row>
        <Key android:codes="49"    android:keyLabel="1"  android:keyEdgeFlags="left" />
        <Key android:codes="50"    android:keyLabel="2" />
        <Key android:codes="51"    android:keyLabel="3" />
        <Key android:codes="69"    android:keyLabel="E" android:horizontalGap="6.25%p" />
        <Key android:codes="70"    android:keyLabel="F" />
        <Key android:codes="55001" android:keyIcon="@drawable/sym_keyboard_allleft" android:horizontalGap="6.25%p" />
        <Key android:codes="55004" android:keyIcon="@drawable/sym_keyboard_allright" android:keyEdgeFlags="right" />
    </Row>
    <Row>
        <Key android:codes="48"    android:keyLabel="0" android:keyWidth="25%p" android:horizontalGap="6.25%p" android:keyEdgeFlags="left" />
        <Key android:codes="-3"    android:keyIcon="@drawable/sym_keyboard_done" android:keyWidth="25%p" android:horizontalGap="12.50%p" />
        <Key android:codes="55000" android:keyLabel="PREV" android:horizontalGap="6.25%p" />
        <Key android:codes="55005" android:keyLabel="NEXT" android:keyEdgeFlags="right" />
    </Row>
</Keyboard>
We can also make tall keys. For example, we could add android:keyHeight="20%p" to the 'F' key, so that it becomes twice as tall. It would then overlap with the 'keyboard hide' key. To prevent that we would typically make the 'keyboard hide' key half the width (12.5%) and add a larger gap (18.75%) before 'PREV' (see below).
To make everything work across different screen sizes, you may want to put things like the keyboard's keyHeight value in device-dependent resource directories. If you use percentages for that (using "%p"), you need to create "fraction" resources (referenced by @fraction/). Thanks for the tip Jan!
3.4.2. Key gaps
Another feature is that we can offset (indent) a row of keys (as we did with the last row), or even (as we also did) add gaps to create islands of keys. Use the attribute android:horizontalGap for that, and my advise is to use percentages here too. The gap settings are shown in red in the code fragment above.
It is possible to add android:horizontalGap and/or android:verticalGap on keyboard level. This is most useful when we want to add a tiny amount of space between all keys. It is tempting to do that in pixels, but this interferes with the key size (width/height) in percentages; they no longer add up to 100%.
I cannot find the spec of horizontalGap, but as this example demonstrates, the gap is before the key that carries the horizontalGap attribute. However, when we add a horizontalGap (on Keyboard level) that is greater than 0, the horizontalGap (on Key level) no longer creates a gap before but now after the key that carries the horizontalGap attribute. To me, this looks like a bug...
Jan had a nasty surprise on his Nexus 4 with KitKat: the landscape rendering is wrong: horizontalGap is after the key, while in portrait it is before! When I tested it on a Nexus 5 with KitKat, I had a similar nasty surprise: for me the the portrait mode is wrong (gaps after key instead of before), and landscape is ok. Jan ended up adding horizontalGap attribute of 1px to Keyboard. But if the first item of the keyboard row has a drawable (as he had it in the last row; that's where he put the hide keyboard key), the behaviour reverses for that key, making it impossible to add a gap after that key...
The keyEdgeFlags are a bit magic. In all the examples I found, the attribute android:keyEdgeFlags="left" is at the left most key in a row and the android:keyEdgeFlags="right" is at the right most key. But when absent, the keyboard still layout's nicely. Because every body seems to do it, I included these flags too. The documentation suggest it has to do with handling touch events: "Flags that specify the anchoring to edges of the keyboard for detecting touch events that are just out of the boundary of the key."
3.4.3. Key labels
The next issue to settle is the labels on the buttons. There are two options: strings and drawables.
String are associated with the attribute keyLabel. As an example, consider the single character labels android:keyLabel="0" or android:keyLabel="A", or the multi character labels android:keyLabel="CLR" or android:keyLabel="NEXT". Jan points out that multi character labels have a smaller font than single character labels because they use labelTextSize instead of keyTextSize, see documentation.
Drawables are associated with the attribute keyIcon. As an example consider android:keyIcon="@drawable/sym_keyboard_allleft" shown below.

The drawable "sym_keyboard_allleft.png"
Please be aware that smaller screens still need some precaution. The figure below shows the same keyboard on a phone. Notice that the icons are too big (this can probably be fixed by including the icons in several resolutions in the res/drawable_xxx directories) and that even plain text labels might become too big ('prev' and 'next' are on the border).
Problems on smaller screens
I have no idea how to change the background color of some keys as is done with the shift/tab/backspace key in the standard keyboard. Will Verduzco wrote a followup article, that touches on the subject of styling.
3.4.4. Key codes
When a key is pressed,the KeyboardView calls the onKey() of its OnKeyboardActionListener. It passes the key code of the key. The key codes are declared in the xml file. For example, for the 'A' key we use the key code 65.
The keyboard is completely app specific: the application has to provide the key handling in the onKey(). This means that the key codes can be chosen freely. Nevertheless, the key handler becomes simpler if we use some standard (e.g. Unicode) for plain keys. And that's what we did in the example.
For the non plain keys (cursor movement, delete), we pick some arbitrary number; the example uses 55000 and higher.
When there is no keyCode, the KeyboardView derives a code from the label. When key android:keyLabel="A" does not have a key code, its gets 65! When key android:keyLabel="PREV" does not have a key code, its gets 80 (the Unicode of 'P' is 80). When a key does not have a code, nor a label, an exception is raised.
A nice feature is the attribute android:isRepeatable="true". It makes the key auto repeat as long as it is pressed. We have used this for the cursor movement and delete.
If we look at the details, there is some unexpected flexibility. Each key may declare a list of key codes (with a maximum of twelve?), such as android:codes="65,66,67". When the key is pressed, the onKey(int primaryCode, int[] keyCodes) is called. The array keyCodes contains this list; it is always (?) twelve integers long where the start of the list has the declared key codes and the list is padded with -1's. The first element of the list is always passed as the primaryCode parameter. The documentation explains the use: "The alternatives will include other characters that may be on the same key or adjacent keys. These codes are useful to correct for accidental presses of a key adjacent to the intended key".
3.4.5. Key popups
An advanced feature is that a key can have a popup. It appears when the key is long pressed. This feature is known from the standard Android keyboard as well: the popup shows alternative keys. For example, a long press on 'e' typically shows 'é', 'è', 'ë' etc.
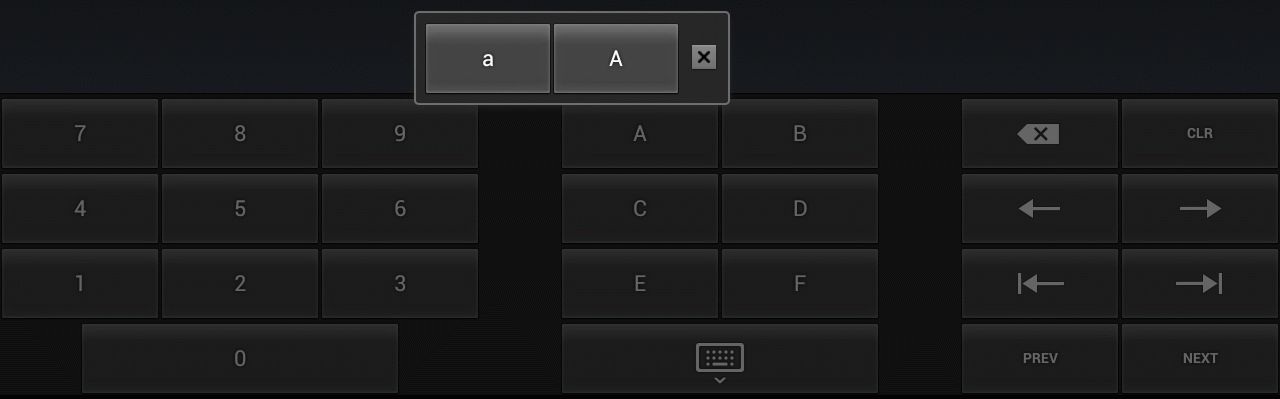
A popup for the 'A' key (on long press), the generic way
There are two ways to make a popup keyboard: generic and dedicated.
The dedicated way is to add an element to a key specifying a keyboard layout for the popup keyboard. For example, we could add android:popupKeyboard="@xml/newkeyboard" to some key. This requires an xml file newkeyboard which has all the features of the main keyboard.
The generic way is to add an element to a key specifying the labels (with implict codes) of the popup keys. For example, we could add android:popupCharacters="aA" to the 'A' key. This does require require an xml file, but only with keyboard level attributes.
The key is decorated as follows.
<Key android:codes="65" android:keyLabel="A" android:popupKeyboard="@xml/popup" android:popupCharacters="aA" >
The popup.xml has the following content.
<?xml version="1.0" encoding="utf-8"?>
<Keyboard xmlns:android="http://schemas.android.com/apk/res/android"
    android:keyWidth="10%p"
    android:keyHeight="10%p">
</Keyboard>
3.5. The key handler
We have to write the key handler ourselves. For this, we add the red code to the creation of the keyboard.
// Create the Keyboard
Keyboard mKeyboard= new Keyboard(MainActivity,R.xml.hexkbd);

// Lookup the KeyboardView
KeyboardView mKeyboardView= (KeyboardView)findViewById(R.id.keyboardview);
// Attach the keyboard to the view
mKeyboardView.setKeyboard( mKeyboard );

// Install the key handler
mKeyboardView.setOnKeyboardActionListener(mOnKeyboardActionListener);
...
}
As mentioned above, the OnKeyboardActionListener has an onKey(), but it has many more methods.
private OnKeyboardActionListener mOnKeyboardActionListener = new OnKeyboardActionListener() {
    @Override public void onKey(int primaryCode, int[] keyCodes) {
    }

    @Override public void onPress(int arg0) {
    }

    @Override public void onRelease(int primaryCode) {
    }

    @Override public void onText(CharSequence text) {
    }

    @Override public void swipeDown() {
    }

    @Override public void swipeLeft() {
    }

    @Override public void swipeRight() {
    }

    @Override public void swipeUp() {
    }
};
We only override the onKey(). It searches for the view in focus (if it is not an EditText, we abort). Then it executes an action based on the actual key code (for a list of key codes, see below).
@Override public void onKey(int primaryCode, int[] keyCodes) {
    // Get the EditText and its Editable
    View focusCurrent = MainActivity.this.getWindow().getCurrentFocus();
    if( focusCurrent==null || focusCurrent.getClass()!=EditText.class ) return;
    EditText edittext = (EditText) focusCurrent;
    Editable editable = edittext.getText();
    int start = edittext.getSelectionStart();
    // Handle key
    if( primaryCode==CodeCancel ) {
        hideCustomKeyboard();
    } else if( primaryCode==CodeDelete ) {
        if( editable!=null && start>0 ) editable.delete(start - 1, start);
    } else if( primaryCode==CodeClear ) {
        if( editable!=null ) editable.clear();
    } else if( primaryCode==CodeLeft ) {
        if( start>0 ) edittext.setSelection(start - 1);
    } else if( primaryCode==CodeRight ) {
        if (start < edittext.length()) edittext.setSelection(start + 1);
    } else if( primaryCode==CodeAllLeft ) {
        edittext.setSelection(0);
    } else if( primaryCode==CodeAllRight ) {
        edittext.setSelection(edittext.length());
    } else if( primaryCode==CodePrev ) {
        View focusNew= edittext.focusSearch(View.FOCUS_BACKWARD);
        if( focusNew!=null ) focusNew.requestFocus();
    } else if( primaryCode==CodeNext ) {
        View focusNew= edittext.focusSearch(View.FOCUS_FORWARD);
        if( focusNew!=null ) focusNew.requestFocus();
    } else {// Insert character
        editable.insert(start, Character.toString((char) primaryCode));
    }
}
The key codes are the codes used in the xml file; they have constants in the java class.
public final static int CodeDelete   = -5; // Keyboard.KEYCODE_DELETE
public final static int CodeCancel   = -3; // Keyboard.KEYCODE_CANCEL
public final static int CodePrev     = 55000;
public final static int CodeAllLeft  = 55001;
public final static int CodeLeft     = 55002;
public final static int CodeRight    = 55003;
public final static int CodeAllRight = 55004;
public final static int CodeNext     = 55005;
public final static int CodeClear    = 55006;
3.6. When to show or hide the custom keyboard
One of the hardest issues with the KeyboardView is making it visible at the right time. There is only one thing harder: making the standard keyboard invisible at the same time!
Let's start by writing the methods that show respectively hide the custom keyboard. After that, we focus on when to call them.
public void hideCustomKeyboard() {
    mKeyboardView.setVisibility(View.GONE);
    mKeyboardView.setEnabled(false);
}

public void showCustomKeyboard( View v ) {
    mKeyboardView.setVisibility(View.VISIBLE);
    mKeyboardView.setEnabled(true);
    if( v!=null ) ((InputMethodManager)getSystemService(Activity.INPUT_METHOD_SERVICE)).hideSoftInputFromWindow(v.getWindowToken(), 0);
}

public boolean isCustomKeyboardVisible() {
    return mKeyboardView.getVisibility() == View.VISIBLE;
}
The showCustomKeyboard() will be called when and EditText is getting focus. We not only show the custom keyboard, but also actively switch off the standard keyboard.
Now to when to show or hide the custom keyboard. The model that we use is that our custom keyboard is "coupled" to one (or more) EditTexts. When a "coupled" EditText has focus the custom keyboard should be visible. By setting the OnFocusChangeListener of the EditText, we can show the custom keyboard when the edit box gets focus, but also hide it when the edit box loses focus.
// Find the EditText
EditText edittext= (EditText)findViewById(...);

// Make the custom keyboard appear
edittext.setOnFocusChangeListener(new OnFocusChangeListener() {
    @Override public void onFocusChange(View v, boolean hasFocus) {
        if( hasFocus ) showCustomKeyboard(v); else hideCustomKeyboard();
    }
});
However, this listener only gets called at the transition of getting (or losing) focus. If the EditText has focus, but the keyboard is hidden (e.g. after pressing the hide keyboard button) how can the user make it visible again? The standard keyboard allows a re-tap of the EditText in focus. Let's mimick that.
edittext.setOnClickListener(new OnClickListener() {
    @Override public void onClick(View v) {
        showCustomKeyboard(v);
    }
});
We are nearly there. When our activity starts, with a coupled EditText in focus, the standard keyboard is displayed. If have no idea why, I would expect the last statement in showCustomKeyboard() would have hidden it, but it hasn't. We add one more line (the red one) to the creation of the keyboard.
// Create the Keyboard
Keyboard mKeyboard= new Keyboard(MainActivity,R.xml.hexkbd);

// Lookup the KeyboardView
KeyboardView mKeyboardView= (KeyboardView)findViewById(R.id.keyboardview);
// Attach the keyboard to the view
mKeyboardView.setKeyboard( mKeyboard );

// Install the key handler
mKeyboardView.setOnKeyboardActionListener(mOnKeyboardActionListener);

// Hide the standard keyboard initially
getWindow().setSoftInputMode(WindowManager.LayoutParams.SOFT_INPUT_STATE_ALWAYS_HIDDEN);
...
}
As a final step, we would like the back button of the activity to close the custom keyboard (if it is open). Therefore, we add the following code to our activity.
@Override public void onBackPressed() {
    if( isCustomKeyboardVisible() ) hideCustomKeyboard(); else this.finish();
}
Still, Android is persistent in poping up the standard keybaord. There is one certain way to stop Android doing this: add edittext.setInputType(InputType.TYPE_NULL) to tell Android that we won't be doing any editing on the EditText. However, this has one small issue, Android won't be showing a cursor. And no, edittext.setCursorVisible(true) doesn't help (I consider this a bug).
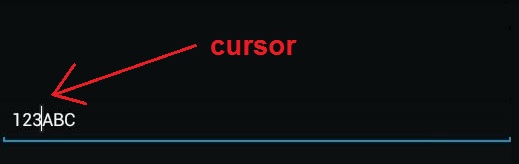
A cursor in an EditText.
If you don't need a cursor, you're done. But we want a cursor: we have added cursor keys in our custom keyboard. So, we can not set the input type to null, we set it to text. As a result, we have to standard keyboard poping up.
I found the following work around on the web (forgot where...). The trick is to have the input type set to text (so that the cursor is always visible), but just before a key press, we set input type to none and call the base class handler. This way, the base class handler only sees input type none and does not pop up the standard keyboard.
edittext.setOnTouchListener(new OnTouchListener() {
    @Override public boolean onTouch(View v, MotionEvent event) {
        EditText edittext = (EditText) v;
        int inType = edittext.getInputType();       // Backup the input type
        edittext.setInputType(InputType.TYPE_NULL); // Disable standard keyboard
        edittext.onTouchEvent(event);               // Call native handler
        edittext.setInputType(inType);              // Restore input type
        return true; // Consume touch event
    }
});
3.7. But I have multiple EditTexts
It is not uncommon that multiple EditTexts need the same custom keyboard. We can solve that be writing all EditText related code in a registerEditText method, and call it for all the EditTexts that need the keyboard.
public void registerEditText(int resid) {
    // Find the EditText 'resid'
    EditText edittext= (EditText)findViewById(resid);
    // Make the custom keyboard appear
    edittext.setOnFocusChangeListener(new OnFocusChangeListener() {
        @Override public void onFocusChange(View v, boolean hasFocus) {
            if( hasFocus ) showCustomKeyboard(v); else hideCustomKeyboard();
        }
    });
    edittext.setOnClickListener(new OnClickListener() {
        @Override public void onClick(View v) {
            showCustomKeyboard(v);
        }
    });
    // Disable standard keyboard hard way
    edittext.setOnTouchListener(new OnTouchListener() {
        @Override public boolean onTouch(View v, MotionEvent event) {
            EditText edittext = (EditText) v;
            int inType = edittext.getInputType();       // Backup the input type
            edittext.setInputType(InputType.TYPE_NULL); // Disable standard keyboard
            edittext.onTouchEvent(event);               // Call native handler
            edittext.setInputType(inType);              // Restore input type
            return true; // Consume touch event
        }
    });
    // Disable spell check (hex strings look like words to Android)
    edittext.setInputType( edittext.getInputType() | InputType.TYPE_TEXT_FLAG_NO_SUGGESTIONS );
}
4. Convert to a class
To make it easier to use a custom keyboard; we can move all keyboard code to a seperate class.
package nl.fampennings.keyboard;
...

class CustomKeyboard {

    private KeyboardView mKeyboardView;
    private Activity     mHostActivity;

    private OnKeyboardActionListener mOnKeyboardActionListener = new OnKeyboardActionListener() {
        @Override public void onKey(int primaryCode, int[] keyCodes) {
            ...
        }
        ...
    };

    public CustomKeyboard(Activity host, int viewid, int layoutid) {
        ...
    }

    public boolean isCustomKeyboardVisible() {
        ...
    }

    public void showCustomKeyboard( View v ) {
        ...
    }

    public void hideCustomKeyboard() {
        ...
    }

    public void registerEditText(int resid) {
        ...
    }

}
The activity then just registers the EditTexts.
package nl.fampennings.keyboard;

import android.app.Activity;
import android.os.Bundle;

public class MainActivity extends Activity {

    CustomKeyboard mCustomKeyboard;

    @Override protected void onCreate(Bundle savedInstanceState) {
        super.onCreate(savedInstanceState);
        setContentView(R.layout.activity_main);

        mCustomKeyboard= new CustomKeyboard(this, R.id.keyboardview, R.xml.hexkbd );

        mCustomKeyboard.registerEditText(R.id.edittext0);
        // mCustomKeyboard.registerEditText(R.id.edittext1);
        // mCustomKeyboard.registerEditText(R.id.edittext2);
        mCustomKeyboard.registerEditText(R.id.edittext3);
        mCustomKeyboard.registerEditText(R.id.edittext4);
    }

    @Override public void onBackPressed() {
        if( mCustomKeyboard.isCustomKeyboardVisible() ) mCustomKeyboard.hideCustomKeyboard(); else this.finish();
    }

}
Download the source of this article.

